
Tauri with GitHub Actions
This guide will walk you through creating a Tauri app from scratch and setting up a release workflow that leverages CrabNebula Cloud from a GitHub Action. This enables you to automatically build and release your app to CrabNebula Cloud every time you push to main and to trigger it manually whenever convenient. Cloud is a great way to distribute your app to your users, providing:
-
Global asset distribution resulting in faster downloads.
-
Automatic application updates: CrabNebula Cloud has first-class integration with the Tauri updater to ensure secure delivery of updates automatically to your users.
-
Nightly application builds/prerelease versions: with this GitHub action, you can ship different application versions to your users, including pre-release variants for staging/trial purposes.
Requirements
To follow this guide you will need:
- Rust and Node.js installed on your machine
- CrabNebula Cloud account
- GitHub account
Create Your App and Upload to GitHub
The first step is to have an app which can be as complex or simple as you wish. If you’re not sure where/how to begin, Tauri is a great place to start. The Tauri docs list multiple ways of getting started and preparing your app with your Web Framework of choice. Additionally, there are multiple community based templates which can be found in the Awesome Tauri repository and at Tauri’s Discord #showcase channel.
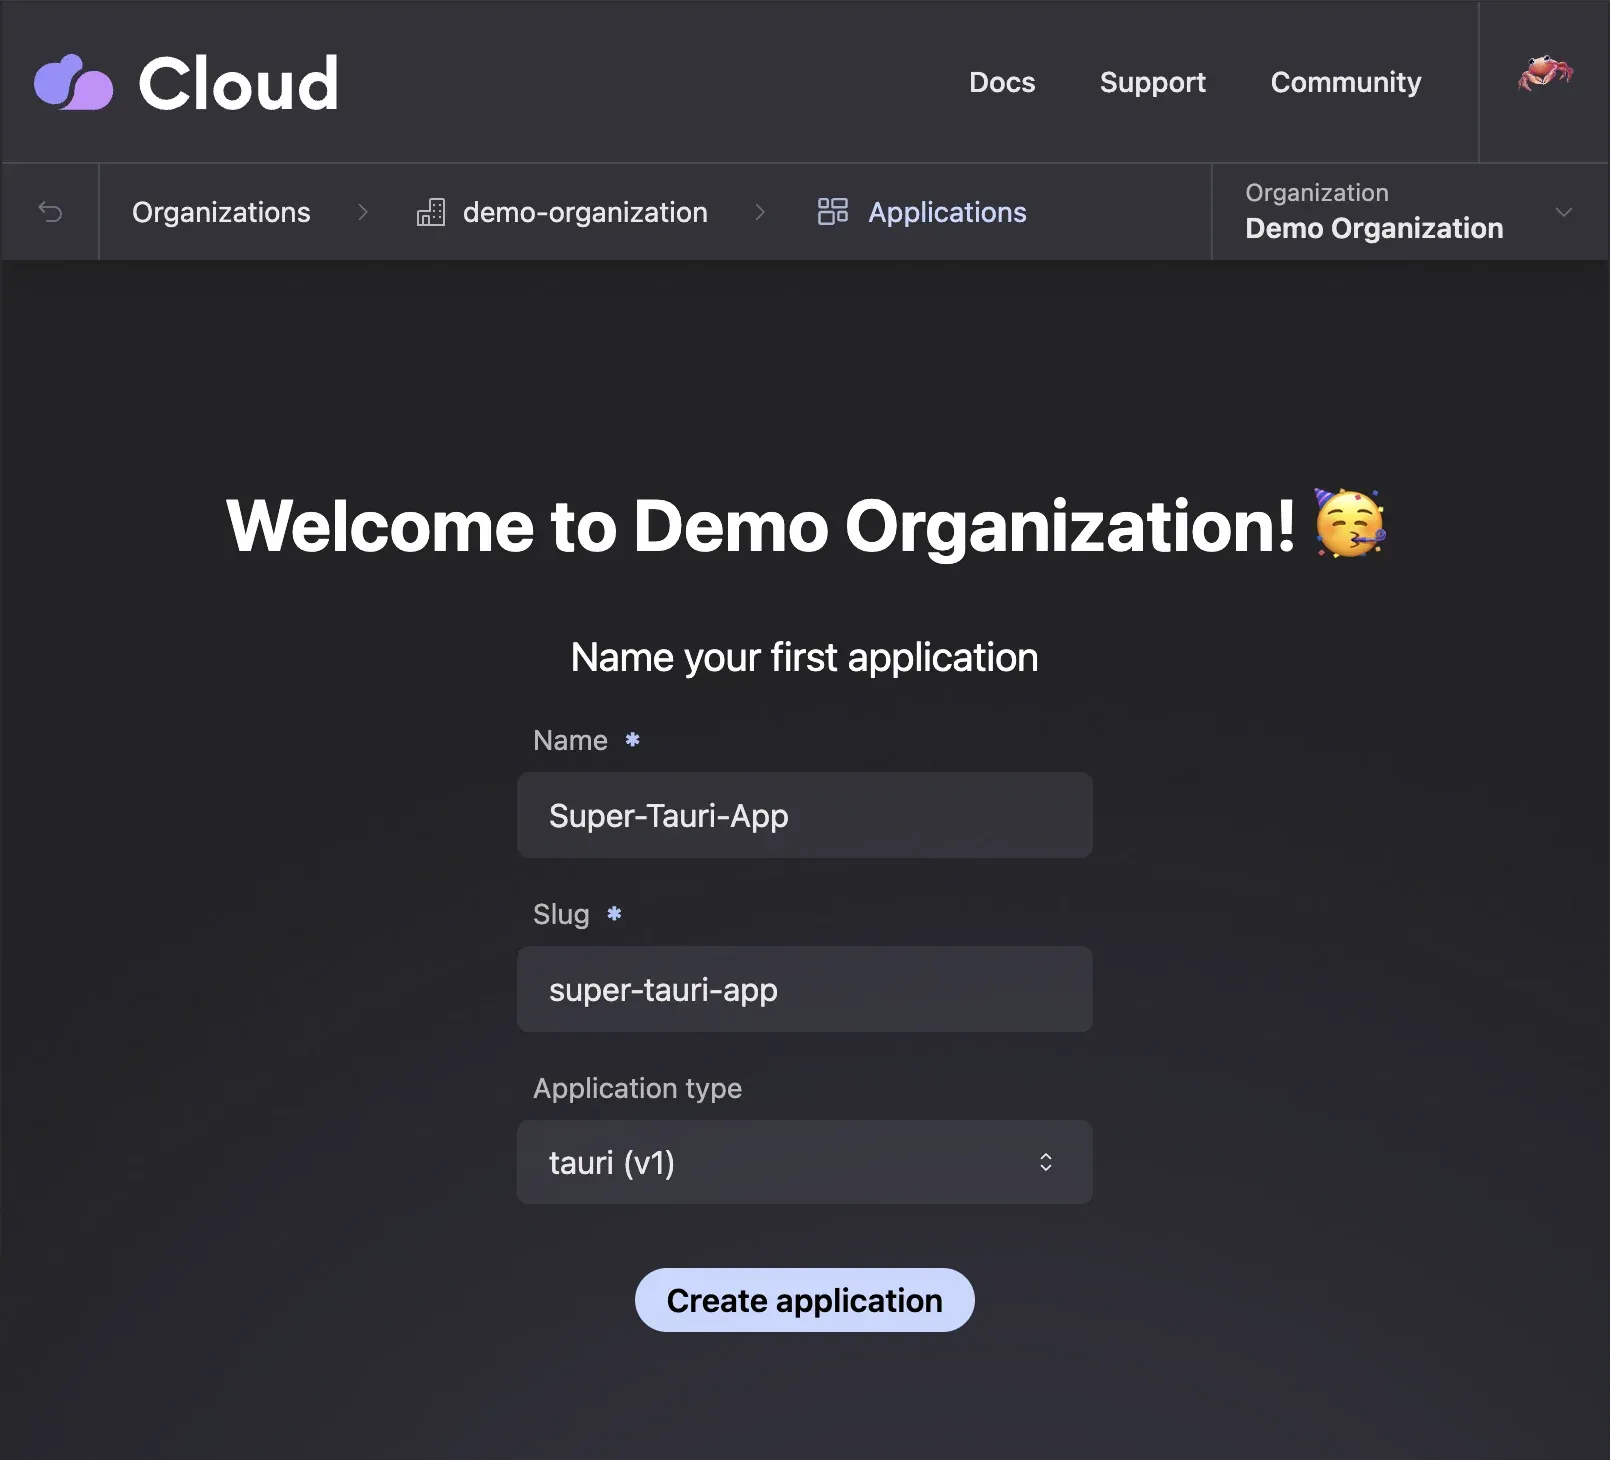
For this guide we will create a new Tauri app. Start from scratch by running the following command:
npm create tauri@latestYou will be taken through a series of questions to set up your app. If you are unsure about an option, stick to the default settings. In the context of this guide we will call our app super-tauri-app. When it comes to choosing a package manager, choose npm as it is the package manager we adapted the following GitHub Actions workflow for.
Once the app is created, you will see a new directory with the app’s name. Change into that directory and you wil find the typical folder structure of a Tauri app.
Now we need to make some minor configuration changes to the app. Edit src-tauri/tauri.conf.json and change the version in the package section to 0.1.0. Also, modify the identifier in the bundle section to match your app’s name and organization. See the following configuration snippets for reference.
"package": { "productName": "super-tauri-app", "version": "0.1.0" }, "bundle": { "active": true, "targets": "all", "identifier": "demo.super-tauri-app", "icon": [ "icons/32x32.png", "icons/128x128.png", "icons/128x128@2x.png", "icons/icon.icns", "icons/icon.ico" ] }Finally initialize a new Git repository which you will then have to push to GitHub. If you are not familiar with the process, check out the GitHub docs.
Set up your app in CrabNebula Cloud
After your app is uploaded to your GitHub repo, head over to CrabNebula Cloud and sign-in with your GitHub account. You will be asked to set up an organization and to create your app.
Now it’s time to prepare an API key for your GitHub Action. In the organizaion navigation on the top right, click on the API keys tab and then on New API key.
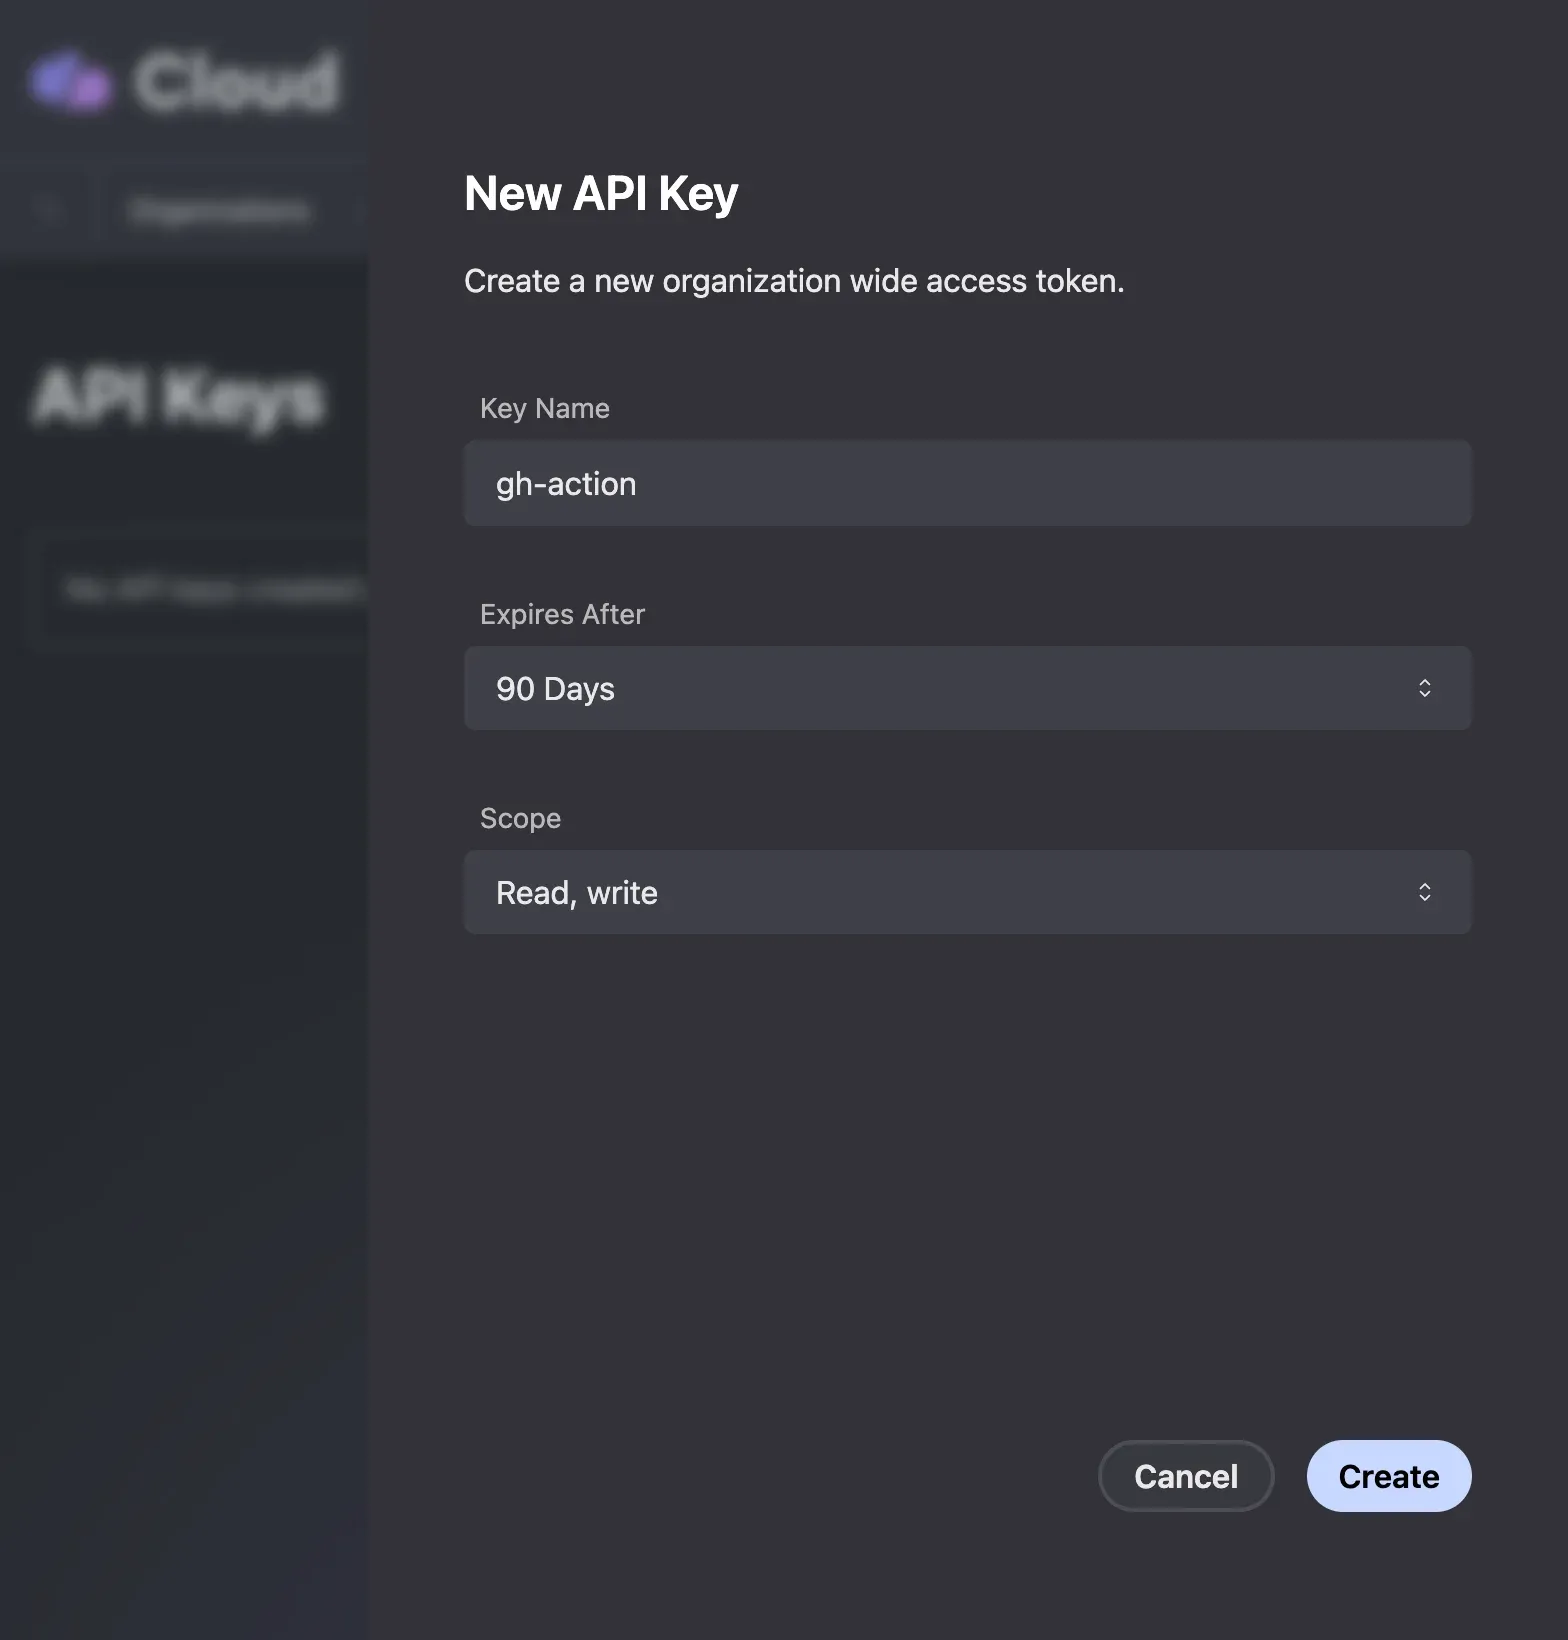
Make sure that you enable Read/Write permissions for the API key. Also note that this key will only be shown once, so make sure to save it for the next step.
Add Cloud API Key to GitHub repo
With the CrabNebula Cloud application set up, it’s time to add the necessary secrets to your GitHub repository. In GitHub go to your repository settings, and click on the Secrets and variables tab in the sidebar and then choose the Actions tab right underneath.
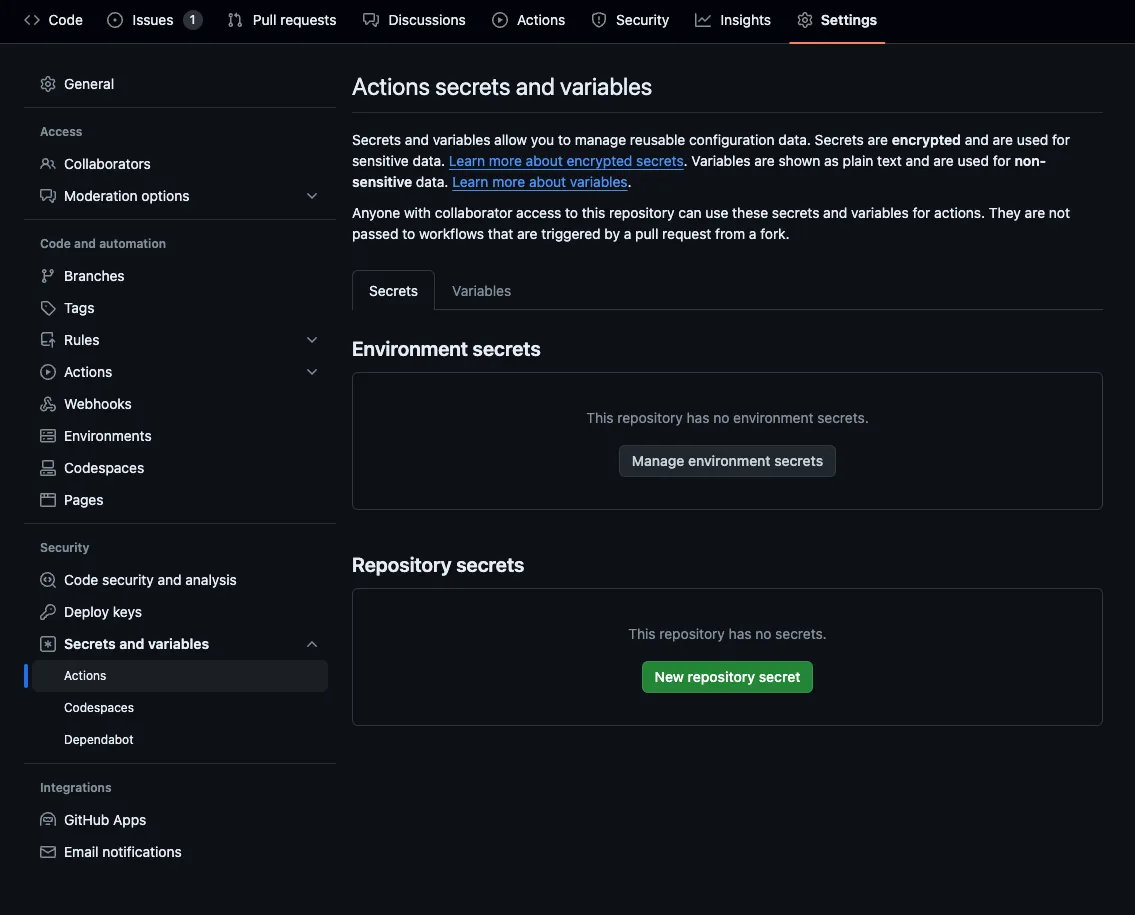
Now add a secret called CN_API_KEY to the Repository Secrets and paste your previously generated CrabNebula Cloud API key. If you have any issues creating or updating the secrets, you can check out the GitHub documentation.
GitHub Action Setup
Now we are ready to set up the GitHub Action that will build and release your app to CrabNebula Cloud. In your GitHub repository, create a new directory .github/workflows and add a new file called release.yml. Alternatively you can create a new workflow via the GitHub GUI.
.github/└── workflows/ └── release.ymlThe release.yml is where we are going to add our GitHub Action code. The first block will determine the name and triggers for this action. We want to release automatically everytime main is updated, but it’s also possible to manually trigger the workflow and to define on-the-fly which app we are working with. The env block will set the app slug to the input value or the default value if not provided. Adjust your app slug accordingly.
name: "Publish Release"
on:  push:    branches:      - main  workflow_dispatch:    inputs:      application:        description: "The fully qualified slug of your app on CrabNebula Cloud"        required: true        default: "my-org/super-tauri-app"
  env:    CN_APPLICATION: ${{ github.event.inputs.application }}
The concurrency block will prevent multiple releases from happening at the same time.
concurrency: group: ${{ github.workflow }}-${{ github.ref }} cancel-in-progress: trueTime to define the actual build jobs. We will name them, give them write permissions, and establish a matrix of environments they will run on. The environments will determine which platforms our app will be built for, in this example we’re selecting all desktop platforms supported by Tauri (MacOS, Linux, and Windows).
First, we create a release draft job. Thanks to crabnebula-dev/cloud-release we just need to call the release command and pass the api-key secret we previously set.
jobs:  draft:    runs-on: ubuntu-latest
    steps:      - uses: actions/checkout@v4
      - name: create draft release        uses: crabnebula-dev/cloud-release@v0        with:          command: release draft ${{ env.CN_APPLICATION }} --framework tauri          api-key: ${{ secrets.CN_API_KEY }}
With a draft done, the task can move on to actually build the app. Let’s make sure the dependency is explicit in our workflow and establish the strategy and matrix for this pipeline.
build:  needs: draft
  strategy:    fail-fast: false    matrix:      os: [ubuntu-22.04, macos-latest, windows-latest]
  runs-on: ${{ matrix.os }}
The above snippet ensures we’re building respectively for Linux, MacOS, and Windows, but only after the draft job is concluded. The steps will be the same for all platforms and so we can define them only once:
steps:  - uses: actions/checkout@v4  - uses: actions/setup-node@v4  - name: Install stable toolchain    uses: actions-rust-lang/setup-rust-toolchain@v1    with:      toolchain: stable      cache: true
  - name: install Linux dependencies    if: matrix.os == 'ubuntu-22.04'    run: |      sudo apt-get update      sudo apt-get install -y webkit2gtk-4.1
  - name: build tauri app    run: |      npm ci      npm exec tauri build
  - name: upload assets    uses: crabnebula-dev/cloud-release@v0    with:      command: release upload ${{ env.CN_APPLICATION }} --framework tauri      api-key: ${{ secrets.CN_API_KEY }}      path: ./src-tauri
With the builds successfully concluded and the build assets uploaded to CrabNebula Cloud, we can trigger the publishing workflow. This will run only in ubuntu-latest since we don’t need the multi-system matrix for this task. And it will have only one step, calling the release publish command from the crabnebula-dev/cloud-release action.
publish:  needs: build
  runs-on: ubuntu-22.04
  steps:    - uses: actions/checkout@v4
    - name: publish release      uses: crabnebula-dev/cloud-release@v0      with:        command: release publish ${{ env.CN_APPLICATION }} --framework tauri        api-key: ${{ secrets.CN_API_KEY }}
With this, our code is ready to be deployed to CrabNebula Cloud. Merging to main will trigger the release and in a few minutes your app will have the correct binaries built and a public changelog including ready-to-share download links available.
Check the complete code snippet for the GitHub Action workflow below:
name: Publish Release
on:  push:    branches:      - main  workflow_dispatch:    inputs:      app-slug:        description: "The slug of your app in your CrabNebula Cloud org"        required: true        default: "super-tauri-app"
concurrency:  group: ${{ github.workflow }}-${{ github.ref }}  cancel-in-progress: true
env:  CN_APPLICATION: ${{ github.event.inputs.app-slug || 'super-tauri-app' }}
jobs:  draft:    runs-on: ubuntu-22.04
    steps:      - uses: actions/checkout@v4
      - name: create draft release        uses: crabnebula-dev/cloud-release@v0        with:          command: release draft ${{ env.CN_APPLICATION }} --framework tauri          api-key: ${{ secrets.CN_API_KEY }}
  build:    needs: draft
    strategy:      fail-fast: false      matrix:        os: [ubuntu-22.04, macos-latest, windows-latest]
    runs-on: ${{ matrix.os }}
    steps:      - uses: actions/checkout@v4      - uses: actions/setup-node@v4      - name: Install stable toolchain        uses: actions-rust-lang/setup-rust-toolchain@v1        with:          toolchain: stable          cache: true
      - name: install Linux dependencies        if: matrix.os == 'ubuntu-22.04'        run: |          sudo apt-get update          sudo apt-get install -y webkit2gtk-4.1
      - name: build tauri app        run: |          npm ci          npm exec tauri build
      - name: upload assets        uses: crabnebula-dev/cloud-release@v0        with:          command: release upload ${{ env.CN_APPLICATION }} --framework tauri          api-key: ${{ secrets.CN_API_KEY }}          path: ./src-tauri
  publish:    needs: build
    runs-on: ubuntu-22.04
    steps:      - uses: actions/checkout@v4
      - name: publish release        uses: crabnebula-dev/cloud-release@v0        with:          command: release publish ${{ env.CN_APPLICATION }} --framework tauri          api-key: ${{ secrets.CN_API_KEY }}
Testing the GitHub Action
Just by committing and pushing to main you will trigger the GitHub Action. You can also manually trigger the workflow by going to the Actions tab in your repository and selecting the workflow you want to run. You will be prompted to enter the app slug, which you can leave unmodified if you want to use the default value.
After you trigger the workflow, you can check the progress in the Actions tab on GitHub. If everything goes well, you will see a new release in your CrabNebula Cloud Application Overview Page. You can check the release status and download the binaries from the Releases tab.
Choose the right format for your platform, download the binary and run it. Now in order to test the automatic release process, make a change to your app, adjust the version number in src-tauri/tauri.conf.json and push the changes to main. After a few minutes, you will see a new release in CrabNebula Cloud.
For example you could change the Welcome to Tauri! heading in index.html and version number in src-tauri/tauri.conf.json to 0.1.1.
After pushing and letting the CI pipeline finish, redownload the app from CrabNebula Cloud and you should see the updated heading.
Final Thoughts
With this setup, you can now have your app automatically built and released to CrabNebula Cloud. This is a great way to keep your app up-to-date and easily shareable with your users. If you have any issues, feel free to reach out at the CrabNebula Discord or the Tauri Discord.